How to Use a Yakitori Grill

Use your yakitori grill to make delicious recipes!
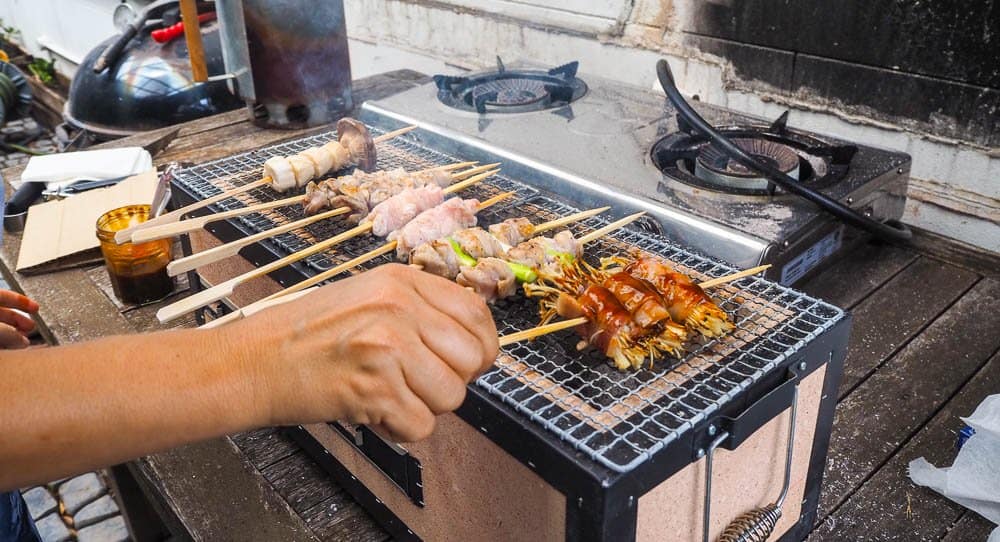
Yakitori grilling is a delightful way to explore the flavors of Japanese cuisine right in your backyard or kitchen. Originating from Japan, yakitori involves skewering meat—typically chicken—along with vegetables and grilling them over a special type of grill known as a yakitori grill. These grills are usually long and narrow, allowing for direct and even heating of the skewers. Here’s a comprehensive guide on how to use a yakitori grill effectively to achieve delicious results every time.
How to Set Up Your Yakitori Grill
The first step to successful yakitori grilling is setting up your grill correctly. If you’re using a charcoal yakitori grill, begin by filling it with high-quality charcoal. Binchotan charcoal is preferred for its ability to burn cleanly at a high temperature without much smoke, enhancing the natural flavors of the food. Light the charcoal and wait until it’s fully ignited and covered in a fine ash. This usually takes about 20 to 30 minutes. The coals should be spread evenly along the length of the grill to create a consistent cooking area.
Preparing the Skewers
While your grill is heating, you can start preparing your skewers. Traditional yakitori uses bamboo skewers, which should be soaked in water for at least 30 minutes before use to prevent them from burning. Cut your chosen meats and vegetables into uniform pieces to ensure they cook evenly. Popular choices include chicken thigh, green onions, and bell peppers. Thread these ingredients onto the skewers, leaving a small space between each piece to allow heat to circulate and cook the skewers evenly.
Grilling Techniques
Once your grill is ready and your skewers are prepared, it’s time to start grilling. Place the skewers over the hot coals, ensuring they’re not touching each other. Yakitori should be cooked over medium heat; if the grill is too hot, the meat will burn on the outside before it’s cooked through. Rotate the skewers frequently to ensure all sides are evenly cooked and achieve a light char, which adds to the flavor. Depending on the ingredients, each skewer will typically need between 10 to 15 minutes on the grill.
Flavor Enhancements
To enhance the flavor of your yakitori, consider basting your skewers with a tare sauce—a traditional, sweet and savory glaze. You can either make your own tare sauce by simmering soy sauce, sake, mirin, and sugar, or use a pre-made version available at most Asian grocery stores. Begin basting the skewers during the last few minutes of cooking to prevent the sauce from burning. A light brushing is sufficient to add flavor without overwhelming the natural taste of the ingredients.
Serving Your Yakitori
Yakitori is best served hot off the grill. In Japan, it is typically enjoyed with a side of cold beer, making it a popular choice for gatherings and parties. Serve the skewers on a clean plate with a sprinkle of sea salt or a squeeze of lemon to brighten the flavors. It’s customary to remove the pieces from the skewers using chopsticks when eating, following the etiquette of Japanese dining.
How to Make a Yakitori Grill?
Creating a homemade yakitori grill can be a rewarding DIY project, especially for enthusiasts of Japanese cuisine who enjoy crafting things with their hands. Yakitori grills are known for their simplicity and efficiency, designed specifically for grilling skewered foods over direct heat. Here’s how you can construct your own yakitori grill using easily accessible materials.
Materials and Tools Needed
To build a basic yakitori grill, you’ll need the following materials and tools:
- A rectangular metal planter box or a long, narrow metal trough (usually stainless steel or aluminum)
- Metal mesh or grilling grate that fits over the planter box
- Heat-resistant metal paint (optional)
- Angle grinder or metal saw
- Drill with metal drill bits
- Safety goggles and gloves
- High-temperature charcoal (like binchotan, if available)
Step 1: Preparing the Container
Start by selecting a suitable container that will serve as the body of your grill. A standard size for a DIY yakitori grill is about 24 inches in length, 6 inches wide, and 6 inches deep. This size is ideal for home use and can accommodate multiple skewers at once. If you purchase a metal planter, ensure it’s not treated with any chemicals or coatings that could emit toxic fumes when heated.
Step 2: Modifying the Container
Using your angle grinder or metal saw, cut any additional openings or modify the structure for ventilation if necessary. It’s essential to have enough air flow to keep your charcoal burning efficiently. Drill several small holes along the bottom and sides of the container to allow for adequate air circulation.
Step 3: Preparing the Grate
Measure and cut your metal mesh or grate to fit securely over the top of the metal container. This grate will hold the skewers and must be sturdy enough to support the weight of the food. Ensure the gaps in the grate are small enough to prevent skewers from falling through.
Step 4: Painting and Finishing Touches
If desired, you can apply heat-resistant paint to your grill for added durability and aesthetics. Make sure the paint is suitable for use on surfaces that will be exposed to high temperatures. Painting is optional but can help prevent rust and extend the life of your grill.
Step 5: Firing It Up
Once your grill is assembled and any paint has dried completely, it’s time to start grilling. Fill the grill with charcoal, preferably binchotan for its long burning time and consistent heat. Light the charcoal and let it burn until it’s covered in white ash, indicating that it’s ready for cooking.
How to Clean a Yakitori Grill?
Keeping your yakitori grill clean is crucial for both the longevity of the grill and the flavor of the food you prepare on it. Regular cleaning ensures that residues from previous grilling sessions don’t interfere with the taste and safety of your dishes. Here’s a detailed guide on how to effectively clean a yakitori grill.
Step 1: Allow the Grill to Cool
First, ensure that your yakitori grill has cooled down completely before attempting to clean it. This is important for safety reasons, as handling hot surfaces can lead to burns.
Step 2: Remove Ash and Charcoal
Once your grill is cool, carefully remove any remaining charcoal and ash from the grill. If your grill has an ash catcher or tray, empty it. For grills without an ash tray, you might need to tip the grill over gently into a metal bin or container to dispose of the ash. Make sure all disposed materials are completely cold to avoid fire hazards.
Step 3: Clean the Grate
The grate is where food residue is most likely to accumulate, so it’s important to clean it thoroughly. If the grate is small enough, soaking it in hot soapy water can help loosen any stuck-on food. Use a grill brush or a scrubbing pad to remove residues. For stubborn grime, a mixture of vinegar and baking soda can be effective. Apply the mixture, let it sit for a few minutes, and then scrub. After scrubbing, rinse the grate thoroughly with clean water.
Step 4: Scrub the Interior
Using a wire brush or a scrub pad, clean the interior surfaces of the grill. You can use a mixture of dish soap and warm water to help dissolve grease and food particles. For tougher residues, you might use a paste made from water and baking soda. Scrub the interior walls and bottom of the grill thoroughly. Rinse with a garden hose or a bucket of water.
Step 5: Wipe Down the Exterior
The exterior of your grill also needs attention. Wipe it down with a cloth soaked in soapy water. For stainless steel grills, using a cleaner specifically designed for stainless steel can help maintain the shine and prevent corrosion. Dry the exterior with a clean cloth to prevent water spots and rusting.
Step 6: Dry and Reassemble
After cleaning, make sure all parts of the grill are completely dry before reassembling. This can be done by wiping down with a dry cloth or letting it air-dry in a well-ventilated area. Once dry, reassemble any parts that were removed, such as the grate.
Step 7: Season the Grate
To prevent rust and to create a non-stick surface, it’s a good practice to season the grate. Lightly coat the grate with cooking oil (high smoke point oils like canola or peanut oil are recommended). Heat the grill for about 15 minutes or until the oil burns off and the grate starts to darken, which indicates that it is well-seasoned.
Conclusion
Using a yakitori grill is a simple yet rewarding cooking experience. By following these steps, you can enjoy authentic yakitori at home and impress your guests with your grilling skills. The key to perfect yakitori lies in the quality of ingredients, even cooking, and the right amount of flavor enhancement with tare sauce. So fire up your grill and start skewering for a delicious journey through Japanese culinary tradition. Check out this cool recipe to get started!


